Sunday, 5 March 2023

Dynamics 365 Customer Experience Focus Areas: Technical Consultant (Beginner Level)

 As a beginner in Dynamics 365 CE, there are several areas that a technical consultant should know. Here are some of the essential areas that you should focus on:

  1. Data Model: Understanding the data model of Dynamics 365 CE is critical. You should know the different types of entities, their relationships, and how to create custom entities.

  2. Configuration: Dynamics 365 CE offers extensive configuration capabilities that allow you to tailor the application to your customer's needs. You should be familiar with the configuration options, including customizing forms, views, dashboards, and business process flows.

  3. Development: Dynamics 365 CE provides a robust development platform that allows you to build custom extensions using various technologies like C#, JavaScript, HTML, and CSS. You should be familiar with the development tools and techniques used in Dynamics 365 CE.

  4. Integration: Dynamics 365 CE supports integration with other systems using various integration technologies like REST API, SOAP, and OData. You should know how to integrate Dynamics 365 CE with other systems.

  5. Security: Dynamics 365 CE has a sophisticated security model that allows you to control access to data and functionality. You should be familiar with the security model and know how to configure security roles and privileges.

  6. Business Processes: Dynamics 365 CE supports various business processes, such as lead management, opportunity management, and case management. You should understand how these processes work and how to configure them to meet your customer's requirements.

  7. Power Platform: Dynamics 365 CE is part of the Microsoft Power Platform, which includes Power Apps, Power Automate, and Power BI. You should be familiar with the Power Platform and know how to leverage its capabilities to build custom solutions.

By mastering these areas, you can become an effective Dynamics 365 CE technical consultant and deliver solutions that meet your customer's needs.

Dynamics 365 Customer Experience Focus Areas: Functional Consultant (Beginner Level)

As a beginner in Dynamics 365 CE, there are several areas a functional consultant should focus on learning:

  1. Understanding the basics of Dynamics 365 CE: A functional consultant should have a good understanding of the basics of Dynamics 365 CE, including the components and architecture of the system, how to navigate the user interface, and how to use the various features and functionalities.

  2. Data management: A functional consultant should have a good understanding of data management in Dynamics 365 CE, including how to create and manage records, import and export data, and perform bulk data operations.

  3. Customization: A functional consultant should have a good understanding of how to customize Dynamics 365 CE, including how to modify forms, views, and dashboards, and how to create custom fields, entities, and workflows.

  4. Business processes: A functional consultant should have a good understanding of how to model business processes in Dynamics 365 CE, including how to define workflows, automate tasks, and configure business rules.

  5. Integration: A functional consultant should have a good understanding of how to integrate Dynamics 365 CE with other systems, including how to use web services, APIs, and third-party connectors.

  6. Reporting and analytics: A functional consultant should have a good understanding of how to create and manage reports and dashboards in Dynamics 365 CE, including how to use advanced analytics tools and features.

  7. Security and permissions: A functional consultant should have a good understanding of security and permissions in Dynamics 365 CE, including how to configure user roles and permissions, and how to set up data access policies.

By focusing on these areas, a functional consultant can gain a solid understanding of Dynamics 365 CE and be able to effectively design, configure, and manage the system to meet the needs of their organization. 

Friday, 18 November 2022

Contextual FAQs for Canvas App

 In this Article, we are going to see how the user will get to know the functionalities available in the current screen (Contextual FAQ). You can create a SharePoint list / Dataverse table to store all the FAQ questions and answers along with the screen name.

In the below app, we have nearly 7 screens. Each screen has  icon, that is used to navigate to the FAQ screen. But the FAQs will be relevant to the screen from where the users came from.


For example, if the user clicks on the Information Icon from home page (image shown above), it will take the user to FAQ screen as shown below


If the user click the Information Icon from contacts screen they will the below set of questions in FAQ screen.

Steps to implement:

FAQ: Questions and Answers are stored in the SP List, that is connected to FAQ Screen in Canvas App. Whenever the user clicks the Information icon, it assigns the Screen Name in the variable varScreenName and that is used in the Filter condition for the FAQ data source in the Gallery items. 

SharePoint List: FAQ


Wednesday, 12 October 2022

Can you imagine an AI app can build a Image or animated video for Occasions or Business by just typing what you want?

Microsoft's new AI Powered App help you create rich banner, flyer or animation for your business or occasions.


Just start typing the content for your banner image, then later you can remove or add content to it. Now, you are able to create your own marketing flyers for sharing it in social media.


You do not need to know how to design a banner or flyer, AI will convert all your requirements to create a suitable image for your marketing emails. 

Good news is you can try it just by joining the waiting list. Checkout this link for more details.

Monday, 22 November 2021

Home Page Idea for SharePoint Team Site

 In this blog, I have created a sample home page for any SharePoint Team Site. We have to create a Web Part Page in Site Pages document library and edit the page, then select the Full View template. After that you need to add Script Editor webpart. 

Now, copy and paste the below code to the Script Editor webpart, your home page is ready.


<p>&nbsp;</p>

<!-- #######  THIS IS A COMMENT - Visible only in the source editor #########-->

<p style="font-size: 1.5em;">&nbsp;</p>

<table style="height: 541px;" width="487">

<tbody>

<tr style="height: 208.5px;">

<td style="width: 477px; text-align: center; background-color: linen; height: 208.5px;" colspan="3"><img src="https://previews.123rf.com/images/varijanta/varijanta1603/varijanta160300108/54405564-flat-line-design-website-banner-of-about-us-company-information-business-solutions-and-services-mode.jpg" alt="" width="466" height="233" />

<h2>Welcome To The SMBC!</h2>

<p>Here is your content for the website</p>

</td>

</tr>

<tr style="height: 47px;">

<td style="width: 154.969px; text-align: center; background-color: darkcyan; height: 47px;">

<p><img src="https://icon-library.com/images/icon-for-create/icon-for-create-11.jpg" alt="" width="23" height="24" /></p>

<span style="color: #ffff99;"><strong>Create New Request</strong></span></td>

<td style="width: 154.969px; text-align: center; background-color: darkgrey; height: 47px;">

<p><img src="https://cdn-icons-png.flaticon.com/512/84/84380.png" alt="" width="23" height="24" /></p>

<span style="color: #ffff99;"><strong>Create New Request</strong></span></td>

<td style="width: 155.062px; text-align: center; background-color: darkolivegreen; height: 47px;">

<p><img src="https://icon-library.com/images/icon-for-create/icon-for-create-11.jpg" alt="" width="23" height="24" /></p>

<span style="color: #ffff99;"><strong>Create New Request</strong></span></td>

</tr>

<tr style="height: 47px;">

<td style="width: 154.969px; text-align: center; background-color: darkslategray; height: 47px;">

<p><img src="https://icon-library.com/images/icon-for-create/icon-for-create-11.jpg" alt="" width="23" height="24" /></p>

<span style="color: #ffff99;"><strong>Create New Request</strong></span></td>

<td style="width: 154.969px; text-align: center; background-color: darkturquoise; height: 47px;">

<p><img src="https://icon-library.com/images/icon-for-create/icon-for-create-11.jpg" alt="" width="23" height="24" /></p>

<span style="color: #ffff99;"><strong>Create New Request</strong></span></td>

<td style="width: 155.062px; text-align: center; background-color: mediumaquamarine; height: 47px;">

<p><img src="https://icon-library.com/images/icon-for-create/icon-for-create-11.jpg" alt="" width="23" height="24" /></p>

<span style="color: #ffff99;"><strong>Create New Request</strong></span></td>

</tr>

</tbody>

</table>

Monday, 5 July 2021

Checking the Date in Filter Query within Power Automate Flow

 In this blog, we are going to see how to compare the due date is today.

Most important thing in the date comparison is Date Format. If it is not matching the right date format then it will endup in error.

The SharePoint field "Due Date" is having the value in "M/d/yyyy" format, so the utcNow() date should also be in the same format, only then we will be able to compare it.

Ex: If the date is "07/06/2021", "MM/dd/yyyy" format will give you the result as "07/06/2021". But if the date format is set to "M/d/yyyy" you will get the date as "7/6/2021". That makes the difference.


The Formula in Filter Query for Due Date is equals to current date should be as shown below:


If you like this post, please do like, share, comment and subscribe.


Saturday, 3 July 2021

Send Reminder email for the Tasks nearing Due Date

In this Article, I have explained the business scenario of sending reminder email for the tasks that are nearing the due date. You can try this approach for any type of reminder email. In this case, I have created a SharePoint list using the Work Progress template. Next thing is to create the Power Automate flow to send the reminder email.

Here are the detailed steps for creating the workflow:

Step:1

Create “Schedule Cloud Flow”, that runs during certain time interval as we set in the configuration.


Step: 2

To specify the configuration for the flow.


Step: 3

Adding steps in Flow, Configure the recurrence criteria. Click on the “…” to find the additional options.


Click on the “Settings” button to configure the Time Interval and Frequency.


Step: 4

Add a new step for SharePoint list to “Get Items” that are matching the criteria of “Due Date” nearing in 3 days from the current date. To achieve this we can make use of the “Filter Query” option as shown below.


First formula that compares “Due Date” greater or equals (ge) with current date (utcnow).

Second formula that compares “Due Date” less than (lt) with current date (utcnow) + 3.

Step: 5

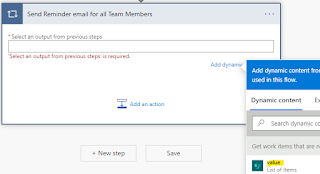
Loop thru the list of tasks that are nearing the “Due Date” and send email to the team member responsible for the task (assigned to).


After the selection of “Apply to each”, from the Dynamic content select the value for the output from previous steps.


Then choose an operation for Sending email.


In the Send an email (V2) action, we can configure To, Cc, Bcc, Subject, Body and Attachments also.

Below example has all the parameters filled.


You can also include the link for the Task in the email by selecting “Link to item”.


Step: 6

After completion, you can Save, Check the Flow and finally Test it.


On clicking the “Test” it shows the “Test Flow” pop-up. You can select “Manually” option and click on the “Save & Test” button.


Output: 

Finally the Flow runs successfully and email is sent to Assigned To person.

Boosting Your Power Pages Portal: Essential Performance Optimization Tips

Introduction: Optimizing the performance of Microsoft Power Pages portals is crucial for ensuring a smooth user experience and maintaining...