To convert a design from Figma to a Canvas app in PowerApps, you can follow these general steps:
Export the Figma design: In Figma, select the design
you want to convert and then click on File > Export. Choose the format that
you want to export the design in (e.g., PNG, JPG, SVG) and save the file to
your computer.
Create a new Canvas app in PowerApps: Log in to
PowerApps and create a new Canvas app. Choose the Image(Preview) option.
Please read the instructions carefully.
Now, we need to upload the image that we have exported from the Figma.
It quickly recognizes all the components in the image, that
we have uploaded in the previous screen.
In this step, we can create the new table in Dataverse to store the values shown in the previous screen or can skip this step for now.
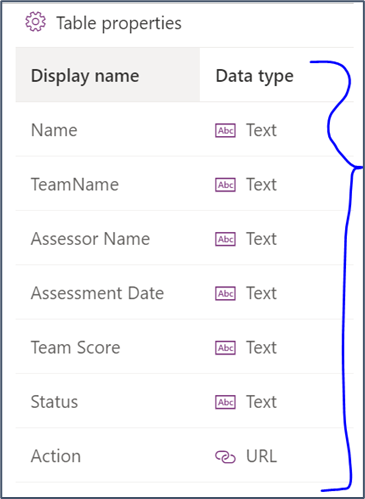
If you have selected the option to create a new table, then you have to provide the data type for the columns.
In this preview, we are provided with few basic data types as shown below.
According to the requirement, we have now selected the column names and data types.
In the next step, you will have the provision to change the table
name and primary field mapping. Once done, final thing is to create the table
by clicking on the “Create” button.
Now you are all set to go, it starts creating the table and canvas app for
you.
Here is the magic, you see the Canvas app is created for you with almost 40% of the content from your image file is now available in the app, with data source (Dataverse table) connected to it. But the content shown in the tabular view are not stored in table as records and is not shown in gallery view here.
Overall, the key to converting a Figma design to a Canvas app in PowerApps is to use the Figma design as a reference and then add the necessary controls and functionality to match the design in PowerApps.
As Image conversion to App feature is still in Preview mode. May be we can try this approach for Form images, but not for grid views or table view images.


