Showing posts with label Power Automate. Show all posts

Saturday 11 March 2023

Dynamics 365 CE: When to use OOB Workflows vs Power Automate Flow

Both Workflows and Power Automate Flows can be used to automate business processes in Dynamics 365 CE, but they have some differences that may make one more suitable than the other depending on the specific scenario.

Here are some general guidelines to help you decide which to use:

  1. Complexity of the process: Workflows are best for simple, linear processes that require only basic logic and don't involve multiple entities. Power Automate Flows, on the other hand, can handle more complex processes that involve multiple entities, conditional branching, looping, and more.

  2. Real-time vs. batch processing: Workflows are designed to run in real-time, meaning they are triggered immediately when a specific event occurs in Dynamics 365 CE. Power Automate Flows, on the other hand, can be triggered in real-time or can be scheduled to run at specific times, making them more suitable for batch processing scenarios.

  3. Integration with external systems: Power Automate Flows have built-in connectors that allow you to easily integrate with external systems like SharePoint, Twitter, and Salesforce. Workflows do not have these connectors, so if you need to integrate with external systems, Power Automate Flows may be the better choice.

  4. User interface: Workflows are created using a point-and-click interface within Dynamics 365 CE, while Power Automate Flows are created in a separate web-based interface. If you prefer to work within Dynamics 365 CE, workflows may be the better choice.

  5. Licensing: Power Automate Flows require a separate licensing, whereas workflows are included in the Dynamics 365 CE licenses.

In summary, Workflows are best for simple processes that require real-time processing and limited external integration, while Power Automate Flows are best for more complex processes that require batch processing and/or integration with external systems.

Sunday 5 March 2023

Move existing email attachments from Dynamics 365 to Azure Blob storage using Power Automate Flow

To move existing email attachments from Dynamics 365 to Azure Blob storage without writing any code, you can follow these steps:

  1. Set up Azure Blob storage: If you haven't already, create an Azure Blob storage account in the Azure portal. Make a note of the storage account name, container name, and access key.

  2. Set up Power Automate: Power Automate (formerly Microsoft Flow) is a cloud-based service that allows you to create automated workflows between different applications and services, including Dynamics 365 and Azure Blob storage. Go to the Power Automate website and sign in with your Microsoft account. If you're new to Power Automate, you may need to create a new account.

  3. Create a new Power Automate workflow: Click on the "Create" button on the Power Automate home page, then select "Instant cloud flow". Give your flow a name and click "Create".

  4. Configure the trigger: In the workflow designer, click on "Manually trigger a flow" under "Start with". This will allow you to manually trigger the flow when you're ready to move email attachments to Azure Blob storage.

  5. Get the email attachments: Add the "Get attachments (preview)" action to the workflow. In the "Email Message Id" field, select the ID of the email message containing the attachments. You can get this ID by opening the email in Dynamics 365 and looking for the "Message Id" field.

  6. Add the Azure Blob storage action: Add the "Create blob" action to the workflow. In the "Blob content" field, select the output from the "Get attachments (preview)" action. In the "Blob name" field, specify a name for the blob. You can use dynamic content to create a unique name for each blob, such as the name of the email attachment.

  7. Configure the Azure Blob storage connection: If you haven't already, you'll need to create a connection to your Azure Blob storage account. Click on "New Connection" under "Connections" and select "Azure Blob Storage". Enter your storage account name, container name, and access key.

  8. Test the workflow: Save and test the workflow to make sure it's working correctly. To trigger the workflow, click on "Run flow" and follow the prompts.

  9. Schedule the workflow (optional): If you want to automate the process of moving email attachments to Azure Blob storage on a regular basis, you can schedule the workflow to run automatically. Click on "Scheduled from blank" under "Start with" and follow the prompts to set up a schedule.

That's it! Your existing email attachments from Dynamics 365 will now be moved to Azure Blob storage automatically.

Monday 5 July 2021

Checking the Date in Filter Query within Power Automate Flow

 In this blog, we are going to see how to compare the due date is today.

Most important thing in the date comparison is Date Format. If it is not matching the right date format then it will endup in error.

The SharePoint field "Due Date" is having the value in "M/d/yyyy" format, so the utcNow() date should also be in the same format, only then we will be able to compare it.

Ex: If the date is "07/06/2021", "MM/dd/yyyy" format will give you the result as "07/06/2021". But if the date format is set to "M/d/yyyy" you will get the date as "7/6/2021". That makes the difference.


The Formula in Filter Query for Due Date is equals to current date should be as shown below:


If you like this post, please do like, share, comment and subscribe.


Saturday 3 July 2021

Send Reminder email for the Tasks nearing Due Date

In this Article, I have explained the business scenario of sending reminder email for the tasks that are nearing the due date. You can try this approach for any type of reminder email. In this case, I have created a SharePoint list using the Work Progress template. Next thing is to create the Power Automate flow to send the reminder email.

Here are the detailed steps for creating the workflow:

Step:1

Create “Schedule Cloud Flow”, that runs during certain time interval as we set in the configuration.


Step: 2

To specify the configuration for the flow.


Step: 3

Adding steps in Flow, Configure the recurrence criteria. Click on the “…” to find the additional options.


Click on the “Settings” button to configure the Time Interval and Frequency.


Step: 4

Add a new step for SharePoint list to “Get Items” that are matching the criteria of “Due Date” nearing in 3 days from the current date. To achieve this we can make use of the “Filter Query” option as shown below.


First formula that compares “Due Date” greater or equals (ge) with current date (utcnow).

Second formula that compares “Due Date” less than (lt) with current date (utcnow) + 3.

Step: 5

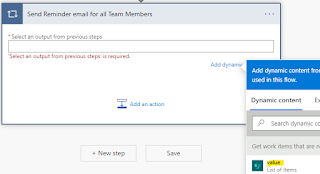
Loop thru the list of tasks that are nearing the “Due Date” and send email to the team member responsible for the task (assigned to).


After the selection of “Apply to each”, from the Dynamic content select the value for the output from previous steps.


Then choose an operation for Sending email.


In the Send an email (V2) action, we can configure To, Cc, Bcc, Subject, Body and Attachments also.

Below example has all the parameters filled.


You can also include the link for the Task in the email by selecting “Link to item”.


Step: 6

After completion, you can Save, Check the Flow and finally Test it.


On clicking the “Test” it shows the “Test Flow” pop-up. You can select “Manually” option and click on the “Save & Test” button.


Output: 

Finally the Flow runs successfully and email is sent to Assigned To person.

Monday 28 June 2021

Fix for Microsoft Forms Button click failed in Power Automate Desktop

 In this blog, I have given the solution for the issue we face while using Microsoft Power Automate Desktop in Microsoft Forms


Problem:
Both Web and Window button click does not work and it throws the below error.


 Failed to press button (failed to get window)

Failed to press button (failed to get window): Robin.Core.ActionException: Failed to press button (failed to get window) ---> Robin.Shared.Runtime.ActionException: Failed to press button (failed to get window)
at Robin.Modules.UIAutomation.Actions.UIUtils.TryFuncThrowExceptionIfNull[T](Func`1 func, ActionException ae)
--- End of inner exception stack trace ---
at Robin.Modules.UIAutomation.Actions.PressWindowButton.Execute(ActionContext context)
at Robin.Runtime.Engine.ActionRunner.RunAction(String action, Dictionary`2 inputArguments, Dictionary`2 outputArguments, IActionStatement statement)

Solution:

 It is actually a work around. Instead of using the "button click" actions, we can use the "Send Keys", when the cursor is in the last control of the form and next is to click on the submit button as shown below. 

Usng the "Insert Special Keys" drop down select the {Tab}{Return} keys in the "Text to Send".

Please try it out and let me know if it worked for you.


Scenarios to use Virtual Table in Dataverse (Power Platform)

Virtual tables in Dataverse provide a way to access extern al data sources without requiring data replication or synchronization. Here are...