Showing posts with label Canvas App. Show all posts

Friday, 14 June 2024

No Code / Low Code apps using Office 365 / Microsoft 365 license

In this blog, we are going to see, how to create Low Code / No Code Apps with your existing Office 365 / Microsoft 365 licenses.

If your organization already has any of the below licenses, you can make use of the Microsoft’s Low Code / No Code platform to create useful apps for your organization.

·       Office 365 E1 / E3 / E5  

·       Microsoft 365 E3 / E5 / F3

PowerApps:

Canvas apps in Power Apps can be built using standard connectors, which allow you to connect to various data sources like Excel sheets stored in SharePoint/OneDrive, Microsoft Lists, SharePoint Lists / Libraries etc.,

Below list of Apps can be created using Canvas App.

  • 1.      Task Management App
  • 2.      Employee Onboarding App
  • 3.      Timesheet App
  • 4.      Inventory Management App
  • 5.      Survey and Feedback app
  • 6.      Assessment App

Power Automate:

In any organization, there would be areas which needs automation. Here are few areas where automation is needed.

  • 1.      Content approvals
  • 2.      Document management (archival)
  • 3.      Data synchronization
  • 4.      Automatic Reminders and Notifications

Copilot Studio:

Chatbot can be created using Copilot Studio that can targeted to fetch data from your organization’s FAQ page or Knowledge base.

Microsoft Forms:

There are scenarios to collect few basic information from the employees within organization or public. Microsoft Forms will be suitable option for those scenarios, few examples are given below:

  • 1.      Surveys and Feedback
  • 2.      Quizzes and Assessments
  • 3.      HR Employee Feedback
  • 4.      Onboarding Experience
  • 5.      Performance Evaluation

Limitations:

There are limitations while using the PowerApps, Power Automate, Copilot Studio using the above-mentioned Office 365 / Microsoft 365 licenses, they are:

  1. No Premium Connectors:
    • You won’t have access to premium connectors (e.g., Salesforce, Dataverse) in your canvas apps.
    • Stick to standard connectors available with those above licenses.
  2. No Custom Connectors:
    • Creating custom connectors is not possible with those above licenses.
    • You’ll need a different license for custom connectors.
  3. No Model-Driven Apps:
    • Above licenses don’t allow you to build model-driven apps.
    • These licenses focus on canvas apps and basic productivity tools.

Hope this blog would have given you overview of utilizing the Office 365/ Microsoft 365 licenses effectively.

Friday, 28 April 2023

Key factors to focus in the Canvas App development

When developing a Canvas App, there are several key factors that you should focus on to ensure that the app meets your needs and the needs of your users. Here are some of the most important factors to consider:

Data protection and privacy: Ensure that the app complies with relevant data protection and privacy regulations, such as GDPR, CCPA, etc. This includes properly securing and protecting user data and obtaining consent for data collection and processing.

Accessibility: Ensure that the app is accessible to all users, including those with disabilities. This includes designing the app with accessibility in mind, such as providing alternative text for images and ensuring keyboard navigation.

Security: Ensure that the app is secure and protected from unauthorized access. This includes implementing appropriate access controls and permissions, using secure data connections, and regularly testing for vulnerabilities.

Governance: Establish governance policies for the app, such as who has access to modify and publish the app, and how changes to the app are reviewed and approved.

Compliance: Ensure that the app complies with relevant organizational policies and procedures, such as branding guidelines, IT policies, and software development standards.

Performance: Ensure that the app performs well and is optimized for speed and efficiency. This includes regularly monitoring and tuning the app's performance.

By considering these policies, you can ensure that your canvas app in Power Platform is developed with security, compliance, accessibility, and performance in mind, providing a valuable tool for your organization while minimizing risk.

Monday, 13 March 2023

Must read: Trying to convert Figma Image to canvas app in PowerApps using Image(Preview)?

 To convert a design from Figma to a Canvas app in PowerApps, you can follow these general steps:

Export the Figma design: In Figma, select the design you want to convert and then click on File > Export. Choose the format that you want to export the design in (e.g., PNG, JPG, SVG) and save the file to your computer.


Create a new Canvas app in PowerApps: Log in to PowerApps and create a new Canvas app. Choose the Image(Preview) option.

Please read the instructions carefully.


Now, we need to upload the image that we have exported from the Figma.


It quickly recognizes all the components in the image, that we have uploaded in the previous screen.


In this step, we can create the new table in Dataverse to store the values shown in the previous screen or can skip this step for now.


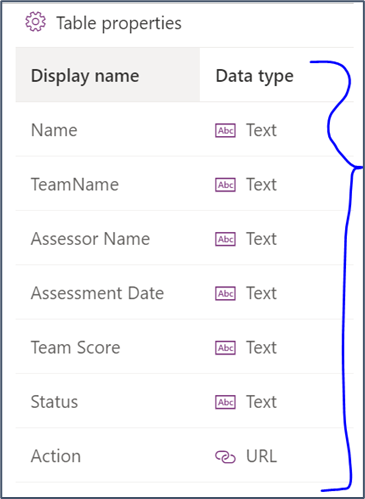
If you have selected the option to create a new table, then you have to provide the data type for the columns.


In this preview, we are provided with few basic data types as shown below. 


According to the requirement, we have now selected the column names and data types.

In the next step, you will have the provision to change the table name and primary field mapping. Once done, final thing is to create the table by clicking on the “Create” button.


Now you are all set to go, it starts creating the table and canvas app for you.


Here is the magic, you see the Canvas app is created for you with almost 40% of the content from your image file is now available in the app, with data source (Dataverse table) connected to it. But the content shown in the tabular view are not stored in table as records and is not shown in gallery view here.


Overall, the key to converting a Figma design to a Canvas app in PowerApps is to use the Figma design as a reference and then add the necessary controls and functionality to match the design in PowerApps. 

As Image conversion to App feature is still in Preview mode. May be we can try this approach for Form images, but not for grid views or table view images.

Wednesday, 8 March 2023

How to consume data from Dynamics 365 Finance and Operations in Canvas App?

 To consume data from Dynamics 365 Finance and Operations in a Canvas app, you can follow these steps:

  1. Create a new connection to Dynamics 365 Finance and Operations in Power Apps. To do this, click on the "Connections" tab and then click on "New Connection." Search for "Dynamics 365 Finance and Operations" and select it.

  2. Authenticate your connection by entering your Dynamics 365 Finance and Operations credentials.

  3. Once your connection is created, you can start building your Canvas app. To add data from Dynamics 365 Finance and Operations, add a new data source by clicking on "Data sources" and then clicking on "Add data source."

  4. Select the Dynamics 365 Finance and Operations connection you just created.

  5. Choose the entity or table that you want to use as a data source. You can do this by selecting the entity from the dropdown list or by searching for it.

  6. Once you have selected your entity, you can add fields to your app by dragging and dropping them onto the canvas.

  7. You can now use the data from Dynamics 365 Finance and Operations in your app. For example, you could use it to display a list of customers, create invoices, or update product information.

  8. To display the data from Dynamics 365 Finance and Operations in a particular format, you can use various controls and functions available in Power Apps, such as galleries, forms, and filters.

  9. Finally, test your app to ensure that the data from Dynamics 365 Finance and Operations is being displayed correctly.

Friday, 18 November 2022

Contextual FAQs for Canvas App

 In this Article, we are going to see how the user will get to know the functionalities available in the current screen (Contextual FAQ). You can create a SharePoint list / Dataverse table to store all the FAQ questions and answers along with the screen name.

In the below app, we have nearly 7 screens. Each screen has  icon, that is used to navigate to the FAQ screen. But the FAQs will be relevant to the screen from where the users came from.


For example, if the user clicks on the Information Icon from home page (image shown above), it will take the user to FAQ screen as shown below


If the user click the Information Icon from contacts screen they will the below set of questions in FAQ screen.

Steps to implement:

FAQ: Questions and Answers are stored in the SP List, that is connected to FAQ Screen in Canvas App. Whenever the user clicks the Information icon, it assigns the Screen Name in the variable varScreenName and that is used in the Filter condition for the FAQ data source in the Gallery items. 

SharePoint List: FAQ


Boosting Your Power Pages Portal: Essential Performance Optimization Tips

Introduction: Optimizing the performance of Microsoft Power Pages portals is crucial for ensuring a smooth user experience and maintaining...