Monday, 17 February 2025

How to print the current canvas app edit form details as PDF from a button click?

Introduction

Printing details from a canvas app edit form as a PDF can be incredibly useful for record-keeping, sharing, and documentation purposes. In this blog post, we'll walk you through the steps to achieve this using Power Apps' experimental PDF function.

Step 1: Enable the PDF Function

Before you can use the PDF function, you need to enable it in Power Apps Studio.

  1. Open Power Apps Studio: Sign in to Power Apps and open your canvas app.
  2. Go to Settings: On the command bar, select Settings.
  3. Enable Experimental Features: Navigate to Upcoming features > Experimental and turn on the PDF function.


Step 2: Add a Button to Generate PDF

Next, you'll add a button to your canvas app that will trigger the PDF generation.

  1. Add a Button: Insert a button onto your canvas app screen.
  2. Set OnSelect Property: In the button's OnSelect property, use the PDF function to generate a PDF of the current screen or form. For example:
    PDF(EditFormScreen)
    
    Replace EditFormScreen with the name of your screen or form.


Step 3: Save and Publish the App

After setting up the button, save and publish your app to make the changes live.

  1. Save: Save your changes.
  2. Publish: Publish the app to make the changes live.


Step 4: Use the Generated PDF

Once the PDF is generated, you can use it in various ways, such as viewing it with a PDF viewer control or sending it via email using Power Automate.

Conclusion

By following these steps, you can easily print the details of your canvas app edit form as a PDF and use it for various purposes. This functionality can greatly enhance the usability and versatility of your Power Apps solutions.

Thursday, 13 February 2025

Maximize Sales Efficiency with Copilot Prompts in Dynamics 365 Sales

 In the fast-paced world of sales, staying organized and efficient is crucial for success. This blog explores how Copilot for Dynamics 365 Sales can revolutionize the way salespersons manage their daily tasks. Discover a range of useful prompts that help streamline lead management, track opportunities, analyze performance, and prepare for meetings. Learn how to leverage Copilot's natural language capabilities to enhance productivity, make data-driven decisions, and drive better business outcomes. Transform your sales processes with the power of Copilot in Dynamics 365 Sales.

Here are some useful Copilot prompts for salespersons regarding leads in Dynamics 365 Sales:

Getting Information

  1. "Show my leads": Displays a list of all your current leads.


  1. "Get details of lead [Lead Name]": Provides detailed information about a specific lead.


  1. "Show leads by status": Lists leads categorized by their status (e.g., new, contacted, qualified).
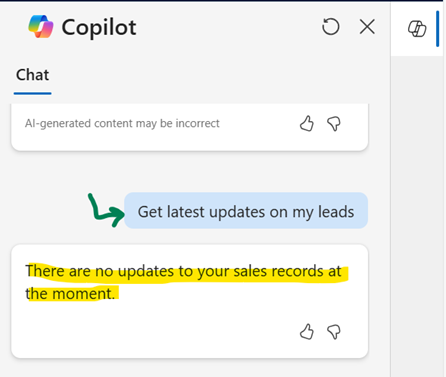
  2. "Get latest updates on my leads": Shows recent changes or updates to your leads.


Analyzing Leads

  1. "Show lead conversion rate": Displays the conversion rate of your leads.


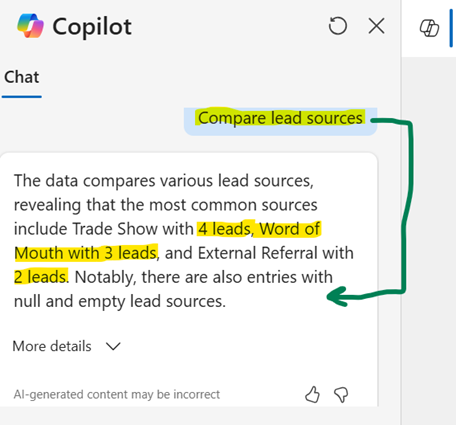
  1. "Compare lead sources": Compares the performance of different lead sources.


  1. "Show leads by region": Lists leads based on their geographical region.


Preparing for Meetings

  1. "Prepare for meeting with lead [Lead Name]": Summarizes notes and recent interactions with a specific lead.


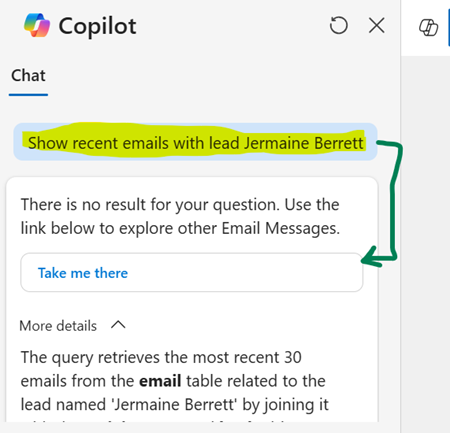
  1. "Show recent emails with lead [Lead Name]": Displays recent email communications with a specific lead.


Follow-Up Actions

  1. "Show leads that need follow-up": Lists leads that require follow-up actions.
  2. "Remind me to follow up with lead [Lead Name]": Sets a reminder to follow up with a specific lead.

Insights and Summaries

  1. "Summarize lead [Lead Name]": Provides a summary of a specific lead's information and interactions.


  1. "Show top leads": Displays the most promising leads based on predefined criteria.


Conclusion

By using Copilot for Dynamics 365 Sales, sales teams can significantly enhance their reporting capabilities. This powerful combination allows for the seamless creation of detailed and insightful sales reports, leveraging data stored in Dataverse. With Copilot's intuitive prompts, salespersons can easily track performance, manage leads, and make data-driven decisions. Embrace this technology to streamline your sales reporting process and stay ahead in the competitive market.

Wednesday, 5 February 2025

Creating a Hotel Reservation Agent with Copilot Studio, Power Automate, and Dataverse

Objective

To create a hotel reservation agent using Copilot Studio, Power Automate, and Dataverse, follow these steps to set up the process flow. This guide will help you understand how to integrate these tools to build an efficient hotel booking system.

Step-by-Step Business Process Flow

1.     User Interaction: (Ava is Fictional Name for the Copilot Agent)

·       User: Hi Ava, I need to book a hotel for my upcoming trip.

·       Ava: Sure! Where are you traveling to, and what are your check-in and check-out dates?

2.     Data Retrieval:

·       Ava: (Triggers Power Automate flow to fetch hotel details from Dataverse)

·       Power Automate: Queries Dataverse for available rooms in hotel blue moon in the specified dates.

3.     Present Options:

·       Ava: Great! Here are some hotel options in Hotel Blue Moon for your dates:

1.     Room 123 - $150 per night, includes breakfast, free Wi-Fi, and a fitness center.

2.     Room 323  - $200 per night, includes breakfast, free Wi-Fi, and a swimming pool.

3.    Room 243  - $180 per night, includes breakfast, free Wi-Fi, and a spa.

4.     Booking Confirmation:

·       User: I would like to book a room at Hotel Blue Moon.

·       Ava: Excellent choice! Please confirm your check-in and check-out dates and provide your contact details and payment method.

·       Ava: (Triggers Power Automate flow to update Dataverse with booking details)

·       Power Automate: Updates Dataverse with the booking information and sends a confirmation.

5.     Final Confirmation:

·       Ava: Your reservation at Hotel Blue Moon is confirmed. Here are the details: [booking confirmation details]. Have a great trip!


Technical Diagram & Solution Approach:

1.     Set Up Dataverse:

·       Create a Dataverse Environment: Start by setting up a Dataverse environment where you will store all the hotel-related data, such as room availability, prices, and booking details.

·       Define Tables: Create tables in Dataverse to store information about hotels, rooms, bookings, and customers. For example:

·       Hotels Table: Columns for Hotel ID, Name, Location, Amenities, etc.

·       Rooms Table: Columns for Room ID, Hotel ID, Room Type, Price, Availability, etc.

·       Bookings Table: Columns for Booking ID, Customer ID, Room ID, Check-in Date, Check-out Date, etc.

·       Customers Table: Columns for Customer ID, Name, Contact Details, etc.

2.     Build the Copilot Studio Agent:

·       Create a New Agent: In Copilot Studio, create a new conversational agent named "Ava."

·       Define Intents and Entities: Set up intents and entities to handle user queries related to hotel reservations. For example:

·       Intents: BookHotel, CheckAvailability, GetHotelDetails, etc.

·       Entities: Destination, CheckInDate, CheckOutDate, NumberOfGuests, etc.

·       Design Dialogs: Create dialogs to guide the conversation flow. For example:

·       Greeting Dialog: Welcome the user and ask for trip details.

·       Booking Dialog: Collect information about the trip and provide hotel options.

·       Confirmation Dialog: Confirm booking details and finalize the reservation.

3.     Integrate Power Automate:

·       Create Flows: Use Power Automate to create flows that connect Copilot Studio with Dataverse. These flows will handle data retrieval and updates. For example:

·       Flow for Fetching Hotel Details: Triggered when the user requests hotel options. This flow queries the Dataverse for available hotels based on the user's criteria and returns the results to the agent.

·       Flow for Booking a Room: Triggered when the user confirms a booking. This flow updates the Dataverse with the booking details and sends a confirmation to the user.

·       Configure Triggers and Actions: Set up triggers (e.g., user requests) and actions (e.g., querying Dataverse, updating records) in Power Automate to ensure seamless data flow.

4.     Connect Copilot Studio to Power Automate:

·       Add Power Automate Actions: In Copilot Studio, add actions to call the Power Automate flows. For example, when the user provides trip details, trigger the flow to fetch hotel options.

·       Handle Responses: Configure the agent to handle responses from Power Automate and present the information to the user in a conversational manner.

Conclusion:

By integrating Copilot Studio, Power Automate, and Dataverse, you can create a powerful hotel reservation agent that streamlines the booking process. Copilot Agent can efficiently handle user queries, fetch relevant data, and manage bookings, providing a seamless experience for users. 


Friday, 13 September 2024

Boosting Your Power Pages Portal: Essential Performance Optimization Tips

Introduction:

Optimizing the performance of Microsoft Power Pages portals is crucial for ensuring a smooth user experience and maintaining high engagement levels. Here are some key points to consider:

Power Pages Portal Performance Optimization:


1. Importance of Performance Optimization:

  • User Experience: Fast-loading pages improve user satisfaction and reduce bounce rates.
  • SEO Benefits: Search engines favor websites that load quickly, which can improve your search rankings.
  • Resource Efficiency: Optimized portals use fewer server resources, which can reduce costs and improve scalability.

2. Key Areas of Focus:

  • Page Load Speed: Minimize the time it takes for pages to load by optimizing images, reducing the number of HTTP requests, and leveraging browser caching.
  • Data Management: Efficiently manage data retrieval and storage to avoid bottlenecks. Use techniques like data caching and indexing.
  • Code Optimization: Ensure that your code is clean and efficient. Minimize the use of heavy scripts and unnecessary plugins.
  • Server Performance: Utilize scalable server solutions and ensure that your server infrastructure can handle peak loads.

3. Tools and Techniques:

  • Performance Monitoring: Use tools like Google PageSpeed Insights to regularly monitor and assess your portal’s performance.
  • Content Delivery Networks (CDNs): Implement CDNs to distribute content closer to users, reducing latency and improving load times.
  • Lazy Loading: Implement lazy loading for images and other media to improve initial page load times.

By focusing on these areas, you can significantly enhance the performance of your Power Pages portal, leading to better user engagement and overall success.

How to print the current canvas app edit form details as PDF from a button click?

Introduction Printing details from a canvas app edit form as a PDF can be incredibly useful for record-keeping, sharing, and documentation p...